
Motorcycle Fairing Well Nuts, Clips & Washers Explained
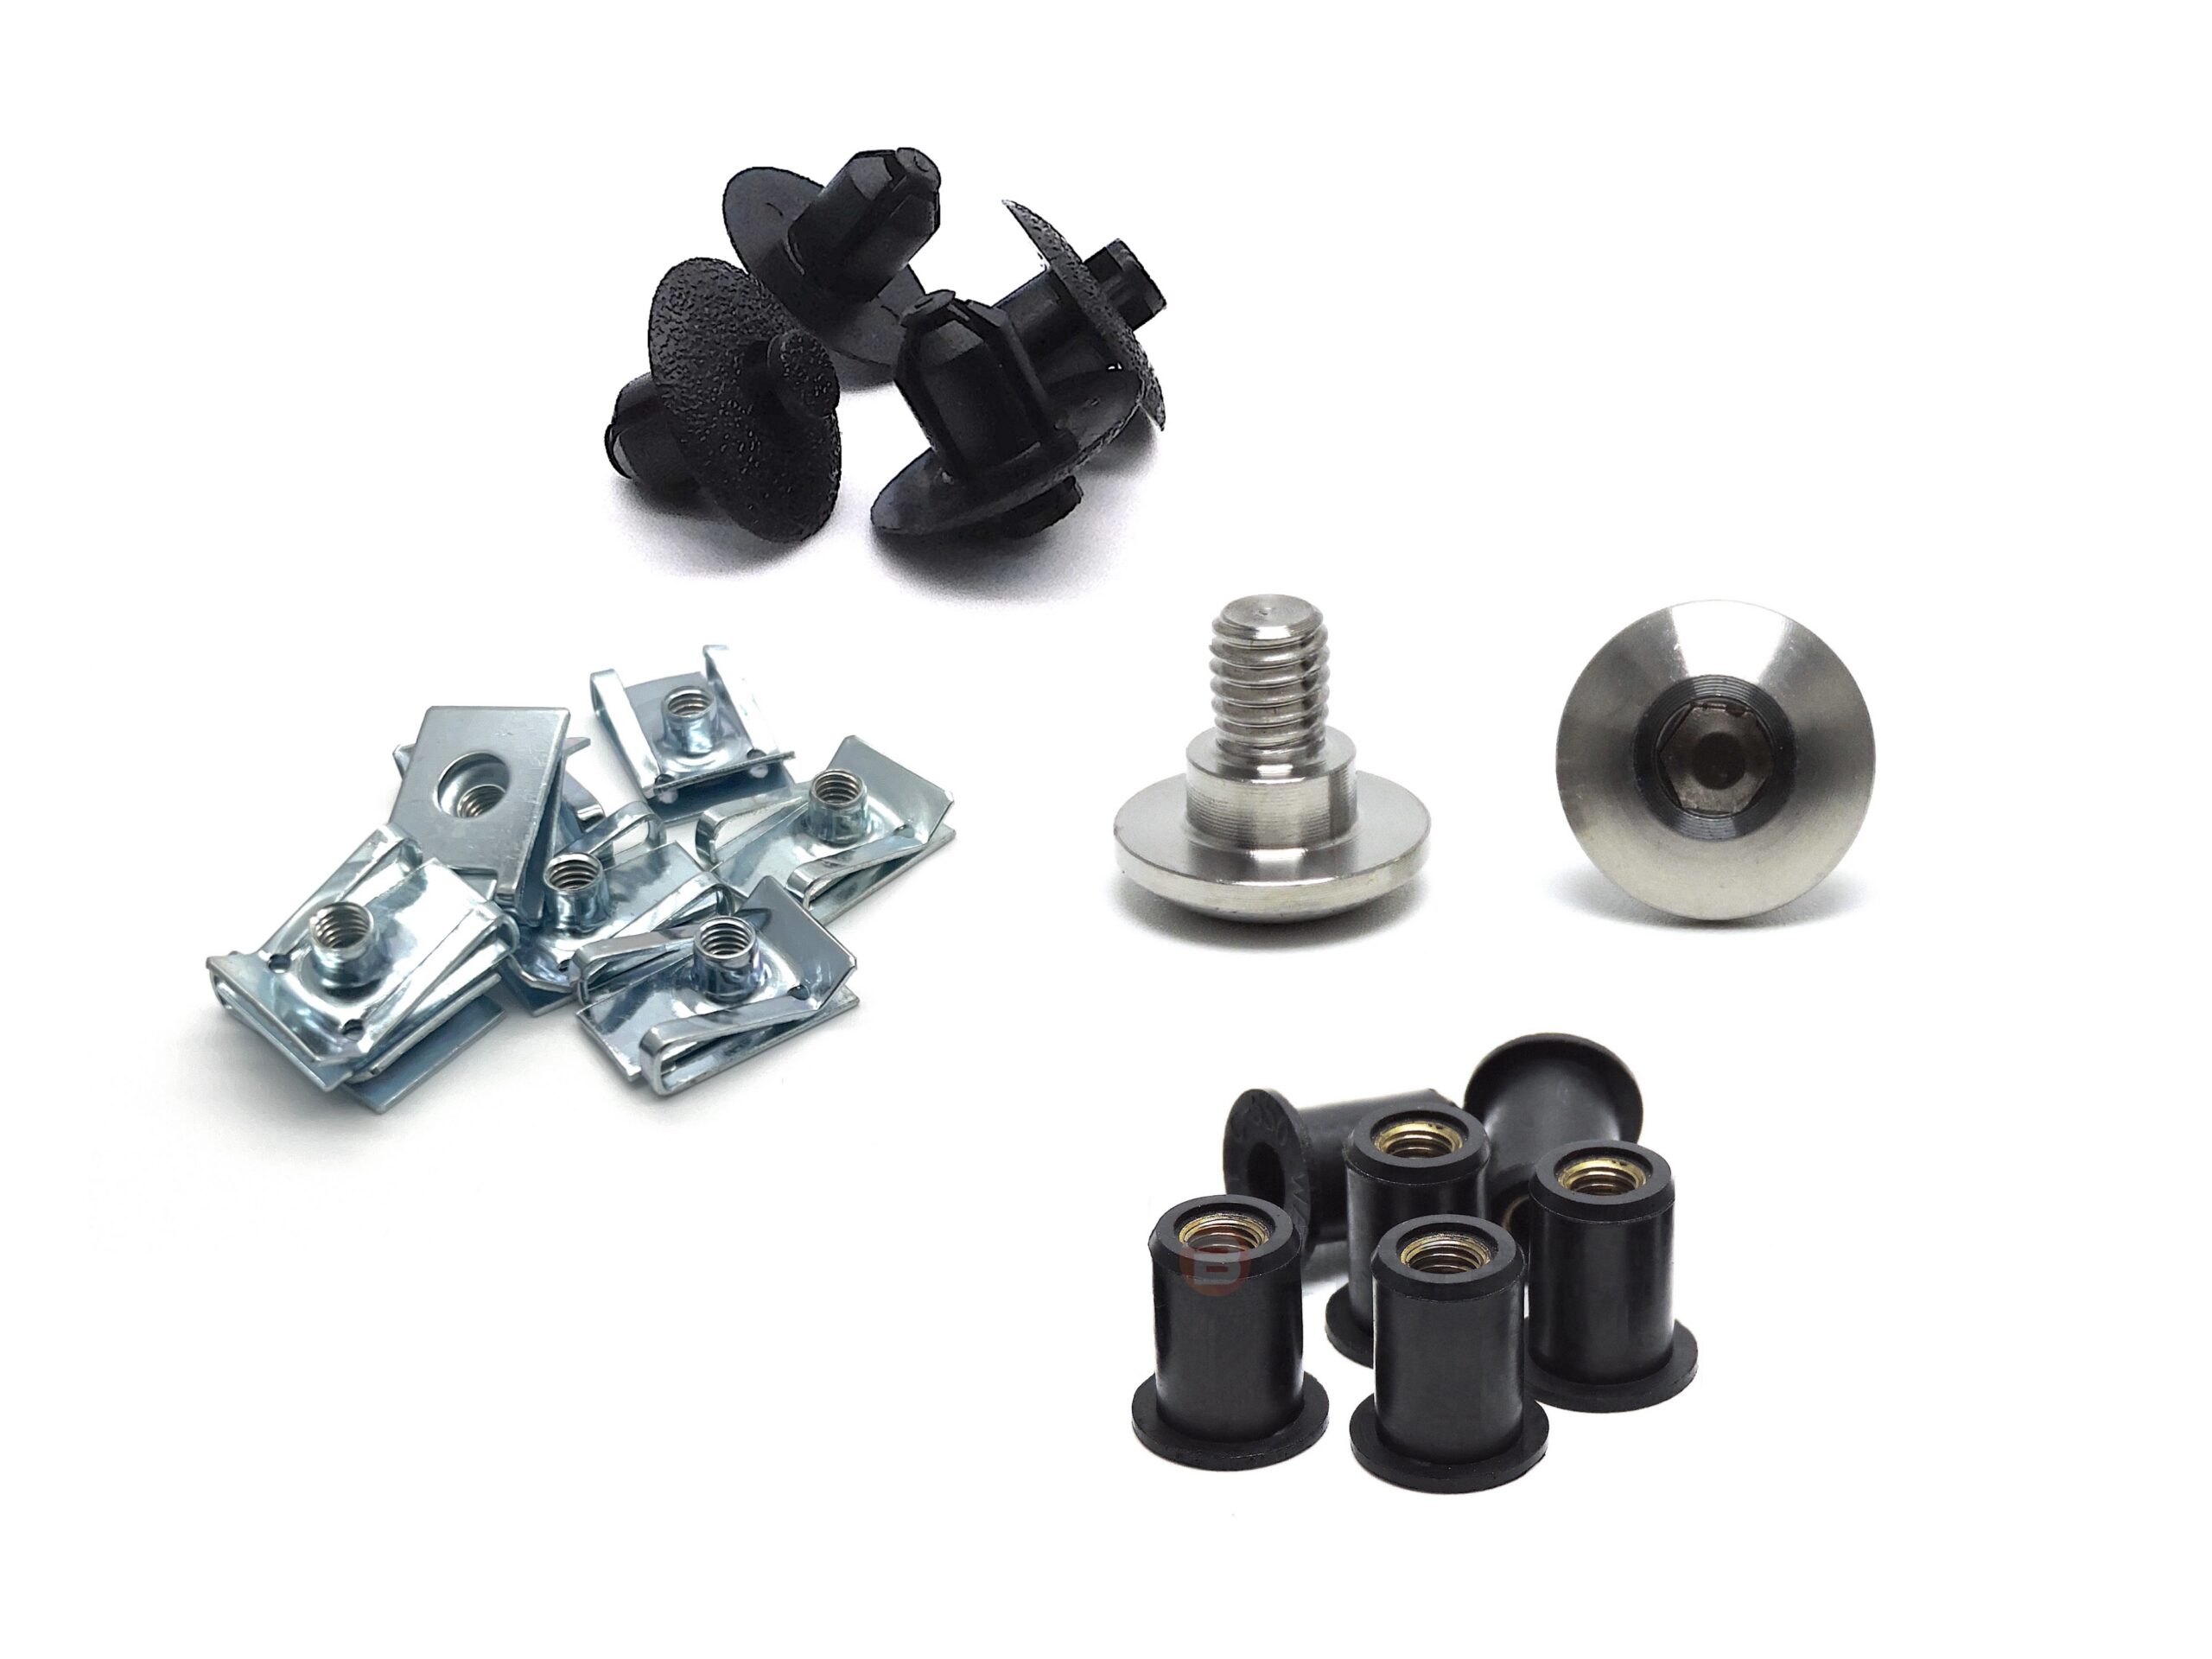
Motorcycle fairing well nuts, clips and washers are small components, but they can make a significant difference to how bodywork fits, moves and survives normal use.
A fairing bolt is often only one part of the complete fixing.
Depending on the motorcycle, the bolt may work with:
- A rubber well nut.
- A metal clip nut.
- A nylon washer.
- A metal washer.
- A rubber grommet.
- A collar.
- A spacer.
- A plastic push clip.
- A captive nut.
If one of these parts is damaged, missing or the wrong size, fitting a new bolt alone may not solve the problem.
The complete mounting arrangement should be checked rather than treating the visible bolt as the whole fixing.
Motorcycle Fairing Well Nuts, Clips & Washers: The Short Answer
Motorcycle bodywork often uses different fixings because plastic panels need to be secured without unnecessary stress or movement.
In simple terms:
- Well nuts provide a threaded fixing within a flexible rubber or elastomer body.
- Clip nuts provide a removable threaded fixing on the edge of a panel, bracket or tab.
- Plastic push clips secure lightweight panels without a conventional bolt.
- Washers can spread load, protect paint or plastic, support other components or form part of the intended clamping arrangement.
- Grommets and collars may isolate vibration or control how much a bodywork mounting is compressed.
These components are not automatically interchangeable.
The correct size, material and design should match the intended mounting position.
What Is a Motorcycle Fairing Well Nut?
A well nut is a flexible fastening insert commonly used on motorcycle windscreens, fairings and lightweight bodywork.
A typical well nut consists of:
- A rubber or elastomer outer body.
- A flange at one end.
- A threaded metal insert.
The well nut is inserted into a mounting hole and the bolt screws into the threaded insert.
As the bolt is tightened, the threaded insert is drawn towards the flange.
This compresses the flexible body and causes part of it to expand or bulge behind the mounting surface.
The expanded section helps retain the well nut in the hole.
This arrangement can provide a threaded fixing while also giving some isolation between the fastener and surrounding panel.
Where Are Motorcycle Well Nuts Used?
Depending on the motorcycle, well nuts may be used around:
- Windscreens.
- Nose cones.
- Upper fairings.
- Side panels.
- Inner cockpit panels.
- Air-intake surrounds.
- Headlight panels.
- Small trim panels.
- Other lightweight bodywork.
Not every visually similar mounting point uses a well nut.
Some may instead use a clip nut, captive nut, threaded bracket or rubber grommet with a collar.
Why Well Nuts Are Useful on Motorcycle Bodywork
Well nuts can offer several useful characteristics in suitable applications.
They can:
- Provide a threaded fixing where there is no permanent threaded boss.
- Help isolate bodywork from direct metal-to-plastic contact.
- Accommodate a degree of vibration.
- Help retain a fitting in thin material.
- Be replaced without repairing a permanent thread in the motorcycle.
They are particularly common around windscreens and bodywork where a rigid threaded joint is not always required.
How a Well Nut Expands
A well nut does not work simply because the bolt screws into the threaded insert.
Its retaining action comes from the flexible body being compressed as the bolt is tightened.
As the insert is pulled towards the flange, the rubber body can expand behind the panel.
The exact amount and shape of this expansion depend on:
- Well-nut design.
- Hole diameter.
- Panel thickness.
- Grip range.
- Bolt length.
- Thread engagement.
- Amount of tightening.
Too little tightening may leave the fitting insufficiently retained, while excessive tightening can damage the well nut, bolt, insert or surrounding bodywork.
The correct installation should follow the motorcycle or component manufacturer’s guidance where available.
Well-Nut Size Matters
Two well nuts may look similar but differ in important dimensions.
Check:
- Bolt thread diameter.
- Thread pitch.
- Outside body diameter.
- Flange diameter.
- Overall length.
- Grip range.
- Mounting-hole diameter.
- Threaded insert depth.
A replacement should suit the actual mounting hole and panel arrangement.
Do not select a well nut only because the bolt screws into it.
Thread Diameter & Pitch Must Match
The bolt and well-nut insert must have matching threads.
For example, an M5 bolt is not completely identified by its diameter alone.
Thread pitch must also match.
Forcing the wrong thread into the insert can damage the well nut or cause the metal insert to rotate inside the rubber body.
Our Motorcycle Metric Thread Pitch Reference Chart explains common metric thread sizes and pitches.
Bolt Length Matters With Well Nuts
A bolt that is too short may not engage the threaded insert correctly.
A bolt that is too long may:
- Extend excessively beyond the insert.
- Interfere with components behind the panel.
- Change how the well nut compresses.
- Prevent the fixing working as intended.
Always check the complete assembly rather than choosing a replacement by thread size alone.
For measurement guidance, see How to Measure Motorcycle Bolts.
Signs a Motorcycle Well Nut Needs Replacing
A well nut may need replacement if it is:
- Split.
- Torn.
- Cracked.
- Hardened.
- Perished.
- Heavily distorted.
- Missing part of its flange.
- Loose in the mounting hole.
- Unable to retain the threaded insert.
- Spinning when the bolt is turned.
- No longer gripping the panel correctly.
Age, heat, chemicals and repeated removal can all affect flexible components.
Inspect well nuts whenever the relevant bodywork is removed.
What If the Metal Insert Spins Inside the Well Nut?
A common problem with worn well nuts is that the threaded insert rotates when the bolt is turned.
This may happen because:
- The rubber body has deteriorated.
- The well nut is no longer gripping the mounting hole.
- The bolt is corroded or seized into the insert.
- The fixing has been overtightened.
- The insert has separated internally.
If the insert spins, repeatedly turning the bolt harder may make removal more difficult.
Consider how the fixing can be supported or removed without damaging the surrounding panel.
For general seized-fastener guidance, see How to Remove Seized, Stuck & Rounded Motorcycle Bolts.
Do Not Overtighten Well Nuts
Well nuts are not intended to be tightened in the same way as a large structural fastener.
Excessive tightening can:
- Tear the rubber body.
- Pull the insert through the well nut.
- Distort the flange.
- Damage the mounting hole.
- Crack or distort surrounding plastic.
- Make later removal more difficult.
The purpose is to secure the panel correctly, not to tighten the bolt as hard as possible.
If the panel remains loose after the well nut has been installed correctly, check the complete mounting arrangement rather than simply adding more torque.
What Is a Motorcycle Fairing Clip Nut?
A clip nut is a removable metal fixing that clips onto the edge of a panel, bracket or mounting tab and provides a threaded or formed-thread location for a screw or bolt.
Common terms can include:
- Clip nut.
- U-nut.
- Spring nut.
- Speed nut.
- Spire clip.
- Panel nut.
These names are sometimes used loosely, and the actual designs can differ.
Some provide a conventional threaded feature.
Others rely on a formed spring-steel thread.
The correct bolt or screw must suit the specific clip.
Where Are Fairing Clip Nuts Used?
Clip nuts are commonly found around:
- Side fairings.
- Lower fairings.
- Belly pans.
- Nose cones.
- Inner panels.
- Mudguards.
- Chain guards.
- Rear bodywork.
- Undertrays.
- Small brackets.
They are useful where the manufacturer needs a threaded fixing but does not want a permanent welded or machined nut.
Why Clip-Nut Position Matters
The threaded hole in a clip nut must align correctly with the mounting hole in the panel.
If the clip is:
- Bent.
- Installed too far onto the tab.
- Installed at an angle.
- The wrong size.
- Positioned on the wrong side.
the bolt may not enter cleanly.
Do not use the bolt to drag a badly misaligned clip into position.
Doing so can:
- Cross-thread the clip.
- Distort the clip.
- Damage the panel.
- Scratch paint.
- Place stress around the mounting hole.
Align the components before final tightening.
Clip Nuts Can Corrode
Metal fairing clips are exposed to:
- Water.
- Road salt.
- Dirt.
- Washing chemicals.
- Moisture trapped behind bodywork.
Corrosion can cause the clip to seize to the bolt.
During removal, the clip may then:
- Rotate.
- Bend.
- Pull off the mounting tab.
- Damage the panel.
- Strip its formed thread.
If a clip is heavily corroded or damaged, replacing it can be more sensible than fitting a new bolt into a poor fixing.
A New Bolt Does Not Repair a Damaged Clip
If a clip nut has stripped or lost its tension, a new stainless bolt will not restore the fixing.
The supporting clip may also need replacing.
Likewise, if the mounting tab has cracked or distorted, the underlying bodywork problem should be addressed.
Treat the mounting point as a complete assembly.
Plastic Push Clips & Rivets
Many motorcycles also use plastic bodywork clips rather than threaded fasteners.
These can secure:
- Inner fairings.
- Undertrays.
- Mudguards.
- Belly pans.
- Heat shields.
- Cockpit trim.
- Small covers.
Different designs use different locking and release methods.
Some use:
- A centre pin.
- An expanding stem.
- A screw-type centre.
- A push-to-release mechanism.
Do not assume every plastic clip is removed in the same way.
Forcing the wrong part can break the retaining legs or enlarge the mounting hole.
Replace Broken Push Clips With the Correct Type
A damaged plastic push clip should not automatically be replaced with a random bolt or self-tapping screw.
A screw can create a much more concentrated load around a plastic mounting hole.
The original push clip may have been selected because it:
- Spreads load differently.
- Allows easier panel movement.
- Fits a specific hole diameter.
- Avoids a permanent threaded joint.
Use the correct fixing type where possible.
Motorcycle Fairing Washers
Washers used on motorcycle bodywork can perform several jobs.
Depending on the mounting point, they may:
- Spread the clamping load.
- Protect paint.
- Protect plastic.
- Prevent direct metal-to-plastic contact.
- Support a rubber grommet.
- Provide a visible finishing surface.
- Form part of a controlled clamping arrangement.
Fairing washers can be made from:
- Stainless steel.
- Plated steel.
- Aluminium.
- Nylon.
- Plastic.
- Rubber.
- Other suitable materials.
The material and dimensions should suit the intended application.
Why Washer Diameter Matters on Plastic Panels
A larger bearing area can distribute clamping force over more of the panel.
This can be useful where the fastener bears against relatively soft bodywork.
However, a larger washer is not automatically better.
It may:
- Interfere with a recess.
- Contact an adjacent moulded feature.
- Prevent the panel seating.
- Look incorrect.
- Alter the intended mounting arrangement.
Match the washer to the fixing rather than simply fitting the largest one that will fit over the bolt.
Nylon & Plastic Fairing Washers
Nylon or plastic washers are often used where the manufacturer wants a softer interface beneath the bolt head.
They may help:
- Protect paint or plastic.
- Reduce marking.
- Provide a neat finish.
- Separate metal parts from the visible panel.
Replacing a nylon washer with a steel washer can change how load is transferred into the bodywork.
If the original used a non-metallic washer, do not assume it was fitted only for appearance.
Rubber Washers & Grommets
Rubber components can provide some isolation between the bodywork and mounting hardware.
A typical arrangement may include:
- A bolt.
- A washer.
- A metal collar.
- A rubber grommet.
- A mounting bracket.
The rubber is often not intended to be compressed indefinitely.
A collar or sleeve can control how far the assembly tightens.
For a broader explanation, see Motorcycle Washers, Spacers & Collars Explained.
Fairing Collars & Sleeves
Small metal collars are easy to lose when motorcycle bodywork is removed.
They may sit:
- Inside a rubber grommet.
- Behind the fairing panel.
- Between the panel and a bracket.
- Beneath the bolt head.
A collar can:
- Maintain spacing.
- Control compression.
- Centre the bolt.
- Provide a smooth surface through a grommet.
Do not discard a collar because it looks like an unnecessary piece of tube.
Without it, tightening the bolt may compress the surrounding plastic or rubber far more than intended.
Missing Spacers Can Cause Bodywork Problems
Some fairing mounting points use separate spacers to maintain the designed distance between the panel and motorcycle.
If a spacer is missing, tightening the bolt can pull the bodywork towards the bracket.
This may cause:
- Panel distortion.
- Cracks.
- Poor alignment.
- Uneven gaps.
- Contact with neighbouring components.
- Stress around the mounting hole.
Do not compensate for a missing spacer by tightening the bolt harder.
Identify the correct missing component.
Why Fairing Fixings Are Often Model-Specific
Motorcycle fairing hardware can vary considerably between models and even between mounting points on the same motorcycle.
Differences can include:
- Bolt length.
- Thread pitch.
- Shoulder dimensions.
- Head diameter.
- Washer size.
- Collar length.
- Spacer thickness.
- Well-nut dimensions.
- Clip-nut design.
- Push-clip diameter.
- Mounting-hole size.
This is why a generic assortment may contain components that look close but do not reproduce the original mounting arrangement.
Our Generic Motorcycle Bolt Kits vs Model-Specific Kits guide explains this distinction in more detail.
Do Not Assume Every Well Nut on the Motorcycle Is the Same
A motorcycle can use different well nuts in different locations.
Two may differ in:
- Thread size.
- Body diameter.
- Length.
- Flange size.
- Grip range.
Keeping removed fixings organised by position can make reassembly much easier.
This is particularly useful when removing complete fairing sets.
Keep Fairing Fixings Organised During Removal
When removing bodywork, store fixings by:
- Panel.
- Position.
- Side of motorcycle.
Small labelled bags or a compartment tray can help prevent:
- Mixing different bolt lengths.
- Losing washers.
- Swapping left and right spacers.
- Forgetting collars.
- Mixing clip types.
Taking photographs before dismantling complicated areas can also help with reassembly.
Inspect Mounting Holes & Tabs
Whenever the fairing is removed, inspect the surrounding mounting points.
Look for:
- Cracks.
- Enlarged holes.
- Broken tabs.
- Distorted brackets.
- Loose captive nuts.
- Corroded clips.
- Torn well nuts.
- Split grommets.
- Missing washers.
- Missing collars.
- Signs of previous overtightening.
A new fixing will not repair a damaged mounting tab.
Correct the underlying problem where necessary.
Concentrated Loads Can Damage Plastic
Plastic bodywork can be vulnerable to high localised loads around mounting holes.
A small or unsuitable bolt head bearing directly against plastic can concentrate force over a limited area.
Depending on the original design, manufacturers may use:
- Wider bolt heads.
- Washers.
- Shoulders.
- Rubber grommets.
- Collars.
- Well nuts.
to create a more suitable mounting arrangement.
This is one reason why removing washers, collars or rubber components can change how the fixing loads the panel.
Do Not Use Fairing Bolts to Pull Panels Into Alignment
If the mounting holes do not line up naturally, investigate the cause.
Possible reasons include:
- Incorrect panel position.
- Missing spacer.
- Wrong bolt fitted elsewhere.
- Misaligned clip nut.
- Trapped wiring.
- Distorted bracket.
- Damaged mounting tab.
- Aftermarket bodywork with different dimensions.
- Previous accident damage.
Using a bolt to force badly misaligned panels together can place unnecessary stress into the bodywork.
Aftermarket Fairings May Use Different Fixings
Replacement or aftermarket bodywork may not always reproduce the original mounting arrangement exactly.
Differences can include:
- Panel thickness.
- Hole diameter.
- Hole position.
- Recess depth.
- Mounting-tab thickness.
An original well nut or clip that worked correctly with the factory panel may therefore need checking before use on an aftermarket part.
Do not automatically enlarge holes or force the original fixing into a panel that was manufactured differently.
Do Fairing Well Nuts Need Threadlocker?
Not automatically.
Many well-nut applications do not require threadlocker.
An unsuitable threadlocking compound may also have compatibility considerations with certain plastics or elastomers.
If the motorcycle or component manufacturer specifies threadlocker for a particular fixing, use the specified product and procedure.
Otherwise, do not add it simply because the bolt is small or exposed to vibration.
See Threadlocker vs Anti-Seize on Motorcycle Bolts for more information.
Should Anti-Seize Be Used on Fairing Fasteners?
Again, not automatically.
Anti-seize changes thread friction and can spread onto:
- Paint.
- Plastic.
- Rubber.
- Visible surfaces.
A small fairing fastener may be threaded into a well nut, clip, aluminium bracket or another type of fixing, so one rule cannot cover them all.
Follow the relevant motorcycle or component instructions.
For more information about lubrication, torque and stainless fasteners, see our Stainless Steel Motorcycle Bolt Torque, Anti-Seize & Galling Guide.
Stainless Steel Fairing Bolts & Supporting Hardware
304 stainless steel is commonly used for suitable visible motorcycle bodywork fasteners because of its corrosion resistance and appearance.
However, replacing the visible bolt does not mean the supporting hardware should automatically be changed to stainless steel.
The original assembly may rely on:
- Spring steel clips.
- Rubber well nuts.
- Nylon washers.
- Plastic clips.
- Aluminium collars.
Each performs a different function.
See Motorcycle Bolt Materials Explained for more information about selecting fastener materials.
When Should Fairing Clips, Well Nuts & Washers Be Replaced?
Consider replacement when the component is no longer able to perform its intended function.
Examples include:
Well nuts:
- Torn or cracked rubber.
- Hardened body.
- Spinning insert.
- Loose fit in the hole.
- Damaged thread.
Clip nuts:
- Severe corrosion.
- Stripped thread.
- Lost spring tension.
- Distortion.
- Cracking.
Washers:
- Splitting.
- Heavy wear.
- Severe corrosion.
- Distortion.
- Loss of a sealing or protective surface.
Plastic clips:
- Broken legs.
- Damaged locking pin.
- Loose fit.
- Excessive deformation.
Do not keep a damaged supporting fixing simply because the visible bolt is new.
Replacing the Complete Fairing Fixing
Sometimes the correct repair requires more than one component.
A complete mounting point can include:
bolt → washer → fairing panel → collar or grommet → well nut or clip
If one part of this arrangement is missing or badly worn, replacing only the bolt may leave the same problem.
Treat the mounting point as a complete system.
Our Motorcycle Fairing Fasteners Explained guide covers the wider range of fasteners used across motorcycle bodywork.
Fitting Motorcycle Fairing Fixings Correctly
Before final tightening:
- Identify the correct bolt and supporting hardware.
- Check the well nut or clip is correctly positioned.
- Fit the required washers, collars and spacers.
- Align the panels without using bolts to force them into position.
- Start threaded fasteners carefully.
- Check that nothing is trapped behind the panel.
- Tighten only as required for the particular fixing.
- Stop if the fitting spins, binds or begins to distort the bodywork.
- Check the panel is secure without being visibly crushed or distorted.
For a complete bodywork installation guide, see How to Fit Motorcycle Fairing Bolts Without Damaging Plastic Panels.
Motorcycle Fairing Well Nuts, Clips & Washers: Simple Rule
The simplest rule is:
Do not look at the fairing bolt in isolation.
Check what is behind it.
A bolt may rely on a well nut, clip, washer, collar, spacer or grommet to function correctly.
Replacing a worn supporting component can be just as important as replacing the visible bolt.
More Biker Bling Motorcycle Fastener Guides
This guide forms part of the Biker Bling technical information library.
For information about motorcycle fairing bolts, washers, collars, thread pitch, fitting and replacement fasteners, visit our Motorcycle Fastener Guides & Technical Information Hub.
You can also use our Motorcycle Fastener Glossary for explanations of terms including well nut, clip nut, grommet, collar, spacer and shoulder bolt.
Find Motorcycle Fairing Fasteners
Biker Bling supplies model-specific motorcycle fairing bolts and selected supporting hardware for a wide range of motorcycles.
Depending on the individual product, kits may include items such as:
- 304 stainless steel fairing bolts.
- Washers.
- Rubber well nuts.
- Clips.
- Other application-specific bodywork fixings.
Browse Biker Bling Motorcycle Fasteners →
Always check the individual product listing for the exact motorcycle, year range, mounting positions and components supplied.
Technical Information Disclaimer
The information on this page is provided as general educational guidance about motorcycle fairing well nuts, clips, washers and related bodywork fixings.
It does not establish the correct fixing dimensions, tightening procedure or hardware specification for a particular motorcycle and is not intended to replace the motorcycle manufacturer’s workshop manual, parts information, component manufacturer’s instructions or advice from a suitably qualified motorcycle technician.
Bodywork designs, panel materials, mounting holes, well-nut sizes, clips, washers, collars and tightening requirements vary between motorcycles.
Where the manufacturer specifies a particular fixing, washer, well nut, clip, spacer, collar, thread treatment or installation procedure, follow those requirements.
Do not force misaligned panels together or continue tightening a fixing that is damaging or distorting the surrounding bodywork.
If the correct fixing arrangement cannot be identified confidently, obtain appropriate technical information before installation.
Nothing on this page is intended to affect your statutory rights or to exclude or restrict any responsibility that cannot lawfully be excluded or restricted.